Wednesday, February 15, 2023

[oracle][weblogic][linux] Install WebLogic Server 12c and Create a Basic Domain [12c][12-2-1-4-0]


(0) Preparation

(0.1) Java

get jdk-8u211-linux-x64.tar.gz


tar xvzf jdk-8u211-linux-x64.tar.gz -C /tmp/


sudo chown -R root:root /tmp/jdk1.8*


mv /tmp/jdk1.8* /usr/lib/jvm/


update-alternatives --install /usr/bin/java java /usr/lib/jvm/jdk1.8*/bin/java 1065


update-alternatives --install /usr/bin/javac javac /usr/lib/jvm/jdk1.8*/bin/javac 1065


update-alternatives --install /usr/bin/jar jar /usr/lib/jvm/jdk1.8*/bin/jar 1065


update-alternatives --install /usr/bin/javaws javaws /usr/lib/jvm/jdk1.8*/bin/javaws 1065


update-alternatives --config java


sudo update-alternatives --config javac


nano $HOME/.bashrc


export JAVA_HOME=/usr/lib/jvm/jdk1.8.0_211


(0.2) WebLogic

get fmw_12.2.1.4.0_wls_lite_generic.jar


mkdir /tmp/wls


cp fmw_12.2.1.4.0_wls_lite_generic.jar /tmp/wls/fmw_12.2.1.4.0_wls_lite_generic.jar


java -jar fmw_12.2.1.4.0_wls_lite_generic.jar


#create group

groupadd oracle


#create user

useradd -m -g oracle -d /home/oracle -s /bin/bash oracle


passwd oracle

qwe123!@#


password


(1) Install WebLogic


Read More

Friday, February 10, 2023

[oracle][weblogic] Configure a JDBC Data Source in Oracle WebLogic Server [12c][12-2-1-4-0]


1. Configure the Oracle Database

Install Oracle Express 11g and execute a sample of the SQL file.


2. Start WebLogic Server


C:\u01\domains\ExampleDomain\wl_server\startWebLogic.cmd

http://localhost:7001/console


3. Configure a JDBC Data Source


In the Change Center, click Lock & Edit.


In the left panel, under Domain Structure, expand Services and select Data Sources.

On the Summary of JDBC Data Sources page, click New and select Generic Data Source.


Name of the data source = myNewDS.
JNDI Name of the data source  = myNewDS.
(There is no requirement for the data source and JNDI names to be the same.)

Database Type = Oracle.

Click Next.


Database Driver = *Oracle's Driver (Thin) for Instance connections; Versions:Any.
Click Next.


Accept default values for transaction.
Click Next.


Click Next.

On the Test Database Connection page, review the connection parameters and click Test Configuration.


If the message Connection test succeeded displays, click Next.

On the Select Targets page, select AdminServer as the data source target.


Click Finish to save the JDBC data source configuration and deploy the data source to the AdminServer (target).


In the Change Center, click Activate Changes.


The Console displays the message: All changes have been activated. No restarts are necessary
In the Summary of JDBC Data Sources page, the new data source, myNewDS, is now listed in the Sources table.


To modify the configuration of the new data source, select the data source name, myNewDS.

On the Settings for myNewDS page, select Configuration and then select Connection Pool, and scroll down to find the capacity fields and change the existing values to:
Initial Capacity =2
Maximum Capacity=20
Minimum Capacity=2


Click Save.


In the Domain Structure tree, expand Environment and select Servers.
In the Servers table, select AdminServer(admin).
To validate the configuration and target of the data source, view myNewDS in the JNDI Tree. 


The JNDI tree opens in a new window and myNewDS appears in the JNDI tree.


4. Deploy Test App

Lock & Edit configuration.
Select Deployment.
Click Install.


Locate the war file.

Select install deployment as an application.


Select deployment target.

Set deployment name.

Review and click Finish.


Save settings.


Click Activate.


Check that the application appear in deployment list.


Click the application name and check the context root i.e. /testds


Browse the url http://localhost:7001/testds.
Enter ...
Data Source Name=myNewDS
Table Name=EMPLOYEE
Username=weblogic
Password=qwe123!@#

Click Test Data Source


The application successfully retrieve the data from the data source.


.

5. Run Script To Deploy Test App


Install GitBash for windows in order to execute Bash command.

Note:
WSLT script has been moved into new location i.e. C:\u01\app\fmw\oracle_common\common\bin


Read More

[oracle][weblogic] Create a Basic Cluster [12c][12-2-1-4-0]


1. Create a Cluster of Existing Managed Servers

Go to WebLogic Server Administration console.

http://localhost:7001/console

Under Domain Structure, expand Environment and select Servers.


On the Summary of Servers page, select Control. If any of the Managed Servers are in the RUNNING state, shut them down.


In the Change Center, click Lock & Edit.


Under Domain Structure, expand Environment and select Clusters.

In the Clusters table, click New, and then select Cluster.


Name: cluster1

Messaging Mode: Unicast


On the Settings for cluster1 page, select Configuration, and then Servers.


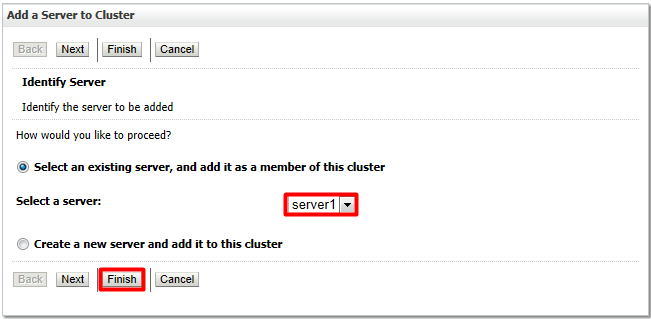
In the Servers table, click Add.


On the Add a Server to Cluster page, select the Managed Servers:

Select the option to add an existing server to the cluster and choose the Managed Server server1 from the drop-down list.

Click Finish.


Repeat for server 2 and server 3.


In the Change Center, click Activate Changes.


The Console displays the message: All changes have been activated. No restarts are necessary.


2. Start the Clustered Servers

To start the Managed Servers in a cluster:

For each machine where Managed Servers are to be started, ensure that the Node Manager is configured properly and is in the Reachable state.

In the left pane of the Console, expand Environment and select Machines.

Select the name of the machine where you want to view the Node Manager status.

On the Settings for Machine page, select Monitoring and then Node Manager Status.


In the WebLogic Server Administration Console, under the Domain Structure, select Clusters.

In the Clusters table, select cluster1 (the newly created cluster).

On the Settings for cluster1 page, select Control.


In the Managed Server Instances in this Cluster table, select the Managed Servers that are in the SHUTDOWN state.

Click Start and confirm to continue.


The selected Managed Servers start. 


Click Refresh refresh icon and ensure that all the Managed Servers are in the RUNNING state.


3. Monitor the Cluster

In the Administration Console, under the Domain Structure, select Environment and then Clusters.

In the Clusters table, select cluster1.

On the Settings for cluster1 page, select Monitoring and then Summary.


To see more information about the servers in the table, click Customize this table and add the columns to the table that you want to display.


Read More