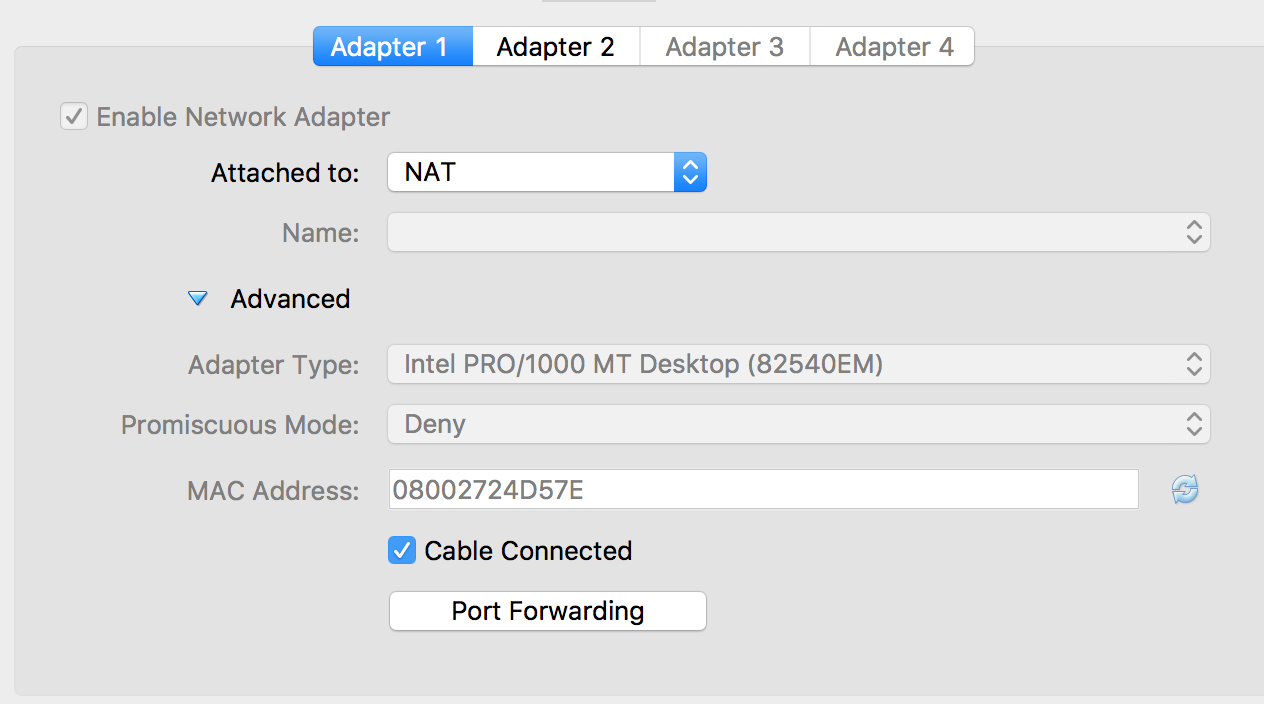
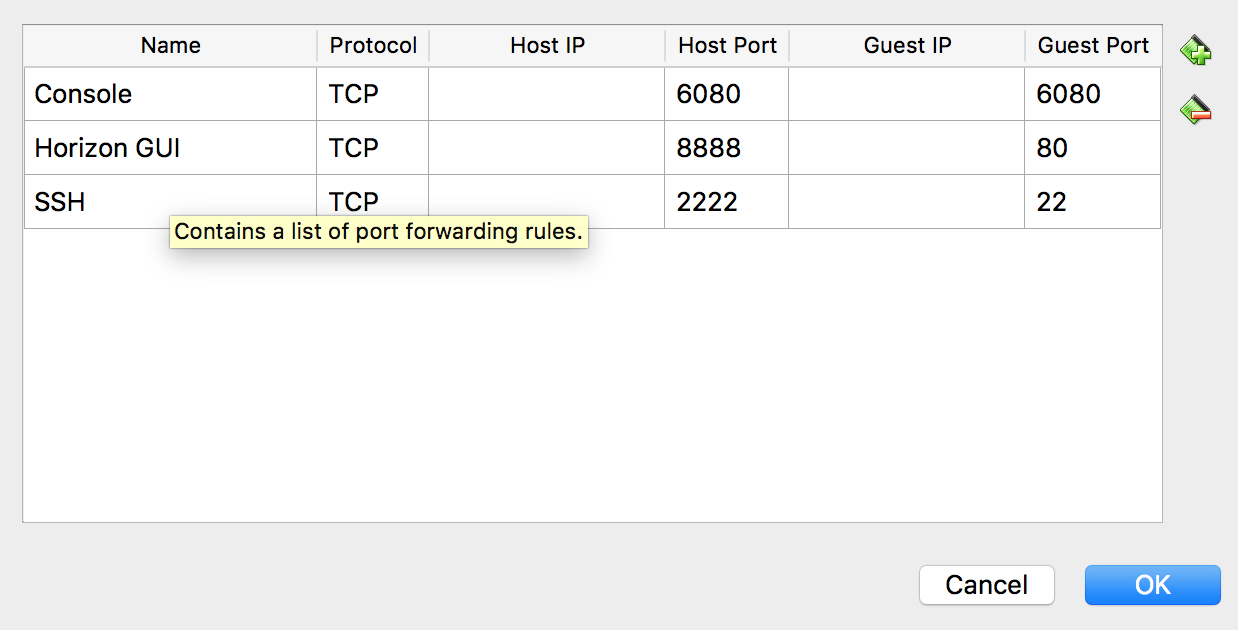
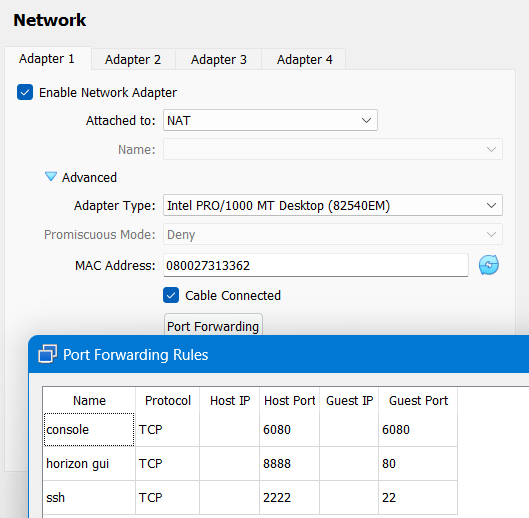
Before running the VM, set its network properties
Set Adapter 2 for installation (using Internet connection)
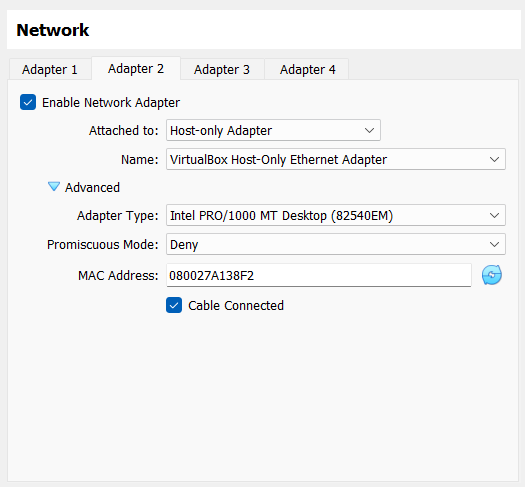
Set Adapter 1 for operation (using Host connection)
Connect to the target system via SSH
SSH -p 2222 xubuntu@localhost
.
Update the target system
sudo apt-get update && sudo apt-get upgrade -y
.
Install snap tool
sudo apt install snapd
.
Install web browser (optional)
sudo apt install midori
.
Create a new user named stack
...so that OpenStack can be installed on a non-root user with sudo enabled
sudo useradd -s /bin/bash -d /opt/stack -m stack
.
Enable stack user to have root privileges and run without a password:
echo "stack ALL=(ALL) NOPASSWD: ALL" | sudo tee /etc/sudoers.d/stack
(The system will respond back with the message "stack ALL=(ALL) NOPASSWD: ALL")
.
Switch user to stack:
sudo su - stack
.
Disable open-vm-tools.service (if any)
# Check open-vm-tools status
sudo systemctl status open-vm-tools.service
# Disable open-vm-tools
sudo systemctl disable open-vm-tools.service
.
Reboot
# Reboot system
sudo reboot now
.
Recconect via SSH and switch user to stack
SSH -p 2222 xubuntu@localhost
sudo su - stack
.
Install microstack:
# Install microstack
sudo snap install microstack --beta
Outcome:
2023-06-11T09:15:37+02:00 INFO Waiting for automatic snapd restart...
microstack (beta) ussuri from Canonical✓ installed
.
Check post-installation
snap list microstack
Outcome:
Name        Version  Rev  Tracking     Publisher   Notes
microstack  ussuri   245  latest/beta  canonical✓  -
(Microstack has been successfully installed)
.
Initialize Microstack
The initialisation step automatically deploys, configures, and starts OpenStack services. In particular, it will create the database, networks, an image, several flavors, and ICMP/SSH security groups. This can all be done within 10 to 20 minutes depending on your machine.
sudo microstack init --auto --control
Outcome:
stack@xubuntu:~$ sudo microstack init --auto --control
2023-06-11 09:27:02,858 - microstack_init - INFO - Configuring clustering ...
2023-06-11 09:27:03,232 - microstack_init - INFO - Setting up as a control node.
2023-06-11 09:27:08,690 - microstack_init - INFO - Generating TLS Certificate and Key
2023-06-11 09:27:10,143 - microstack_init - INFO - Configuring networking ...
2023-06-11 09:27:20,398 - microstack_init - INFO - Opening horizon dashboard up to *
2023-06-11 09:27:22,145 - microstack_init - INFO - Waiting for RabbitMQ to start ...
Waiting for 10.0.2.15:5672
2023-06-11 09:27:33,715 - microstack_init - INFO - RabbitMQ started!
2023-06-11 09:27:33,716 - microstack_init - INFO - Configuring RabbitMQ ...
2023-06-11 09:27:36,151 - microstack_init - INFO - RabbitMQ Configured!
2023-06-11 09:27:36,208 - microstack_init - INFO - Waiting for MySQL server to start ...
Waiting for 10.0.2.15:3306
2023-06-11 09:27:59,904 - microstack_init - INFO - Mysql server started! Creating databases ...
2023-06-11 09:28:03,402 - microstack_init - INFO - Configuring Keystone Fernet Keys ...
2023-06-11 09:28:43,852 - microstack_init - INFO - Bootstrapping Keystone ...
2023-06-11 09:29:02,849 - microstack_init - INFO - Creating service project ...
2023-06-11 09:29:11,089 - microstack_init - INFO - Keystone configured!
2023-06-11 09:29:11,180 - microstack_init - INFO - Configuring the Placement service...
2023-06-11 09:29:39,008 - microstack_init - INFO - Running Placement DB migrations...
2023-06-11 09:29:45,510 - microstack_init - INFO - Configuring nova control plane services ...
2023-06-11 09:30:09,190 - microstack_init - INFO - Running Nova API DB migrations (this may take a lot of time)...
2023-06-11 09:30:55,214 - microstack_init - INFO - Running Nova DB migrations (this may take a lot of time)...
Waiting for 10.0.2.15:8774
2023-06-11 09:33:16,803 - microstack_init - INFO - Creating default flavors...
2023-06-11 09:33:52,951 - microstack_init - INFO - Configuring nova compute hypervisor ...
2023-06-11 09:33:52,952 - microstack_init - INFO - Checking virtualization extensions presence on the host
2023-06-11 09:33:52,976 - microstack_init - WARNING - Unable to determine hardware virtualization support by CPU vendor id "AuthenticAMD": assuming it is not supported.
2023-06-11 09:33:52,976 - microstack_init - WARNING - Hardware virtualization is not supported - software emulation will be used for Nova instances
2023-06-11 09:33:56,309 - microstack_init - INFO - Configuring the Spice HTML5 console service...
2023-06-11 09:33:56,942 - microstack_init - INFO - Configuring Neutron
Waiting for 10.0.2.15:9696
2023-06-11 09:36:40,924 - microstack_init - INFO - Configuring Glance ...
Waiting for 10.0.2.15:9292
2023-06-11 09:37:37,764 - microstack_init - INFO - Adding cirros image ...
2023-06-11 09:37:42,719 - microstack_init - INFO - Creating security group rules ...
2023-06-11 09:37:57,554 - microstack_init - INFO - Configuring the Cinder services...
2023-06-11 09:39:28,146 - microstack_init - INFO - Running Cinder DB migrations...
2023-06-11 09:39:50,566 - microstack_init - INFO - restarting libvirt and virtlogd ...
2023-06-11 09:40:02,399 - microstack_init - INFO - Complete. Marked microstack as initialized!
(Microstack has been successfully initialized)
.
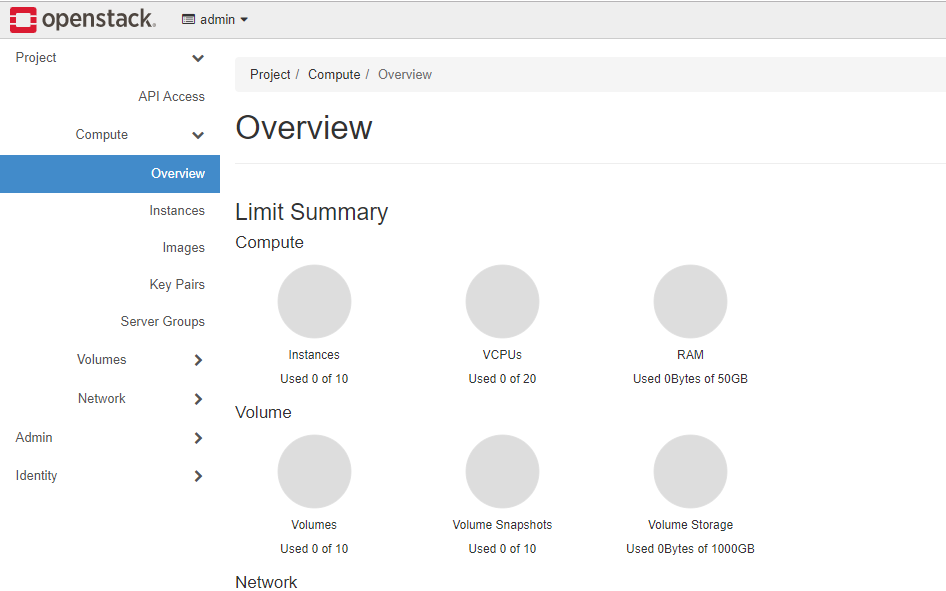
Verification
The purpose of the verification step is to confirm that the cloud is in working order and to discover some of the defaults used by MicroStack. Verification will consist of the following actions:
Query OpenStack
To list the default image
sudo microstack.openstack image list
Outcome:
+--------------------------------------+--------+--------+
| ID                                   | Name   | Status |
+--------------------------------------+--------+--------+
| e6aebf13-e081-4cab-8323-61123a4f6033 | cirros | active |
+--------------------------------------+--------+--------+
.
To get the default list of flavors
sudo microstack.openstack flavor list
Outcome:
+----+-----------+-------+------+-----------+-------+-----------+
| ID | Name      |   RAM | Disk | Ephemeral | VCPUs | Is Public |
+----+-----------+-------+------+-----------+-------+-----------+
| 1  | m1.tiny   |   512 |    1 |         0 |     1 | True      |
| 2  | m1.small  |  2048 |   20 |         0 |     1 | True      |
| 3  | m1.medium |  4096 |   20 |         0 |     2 | True      |
| 4  | m1.large  |  8192 |   20 |         0 |     4 | True      |
| 5  | m1.xlarge | 16384 |   20 |         0 |     8 | True      |
+----+-----------+-------+------+-----------+-------+-----------+
.
Create an instance
MicroStack comes with a convenient instance creation command called microstack launch. It uses the following defaults for its instances:
To create an instance named ‘test’ based on the ‘cirros’ image
sudo mkdir -p /home/root/snap/microstack/common
sudo microstack launch cirros -n test
Outcome:
Creating local "microstack" ssh key at /home/root/snap/microstack/common/.ssh/id_microstack
Launching server ...
Allocating floating ip ...
Server test launched! (status is BUILD)

Access it with `ssh -i /home/root/snap/microstack/common/.ssh/id_microstack cirros@10.20.20.26`
You can also visit the OpenStack dashboard at https://10.20.20.1:443
Download/clone devstack from its repository:
.
git clone https://opendev.org/openstack/devstack
(Devstack repo contains a script stack.sh , which will be used in OpenStack installation.)
.
Prepare a configuration file:
cd devstack
vim local.conf
Paste the following content:
[[local|localr]]
ADMIN_PASSWORD=StrongAdminSecret
DATABASE_PASSWORD=$ADMIN_PASSWOCinder
RABBIT_PASSWORD=$ADMIN_PASSWORD
SERVICE_PASSWORD=$ADMIN_PASSWORD
To add to the group nopasswdlogin: sudo usermod -a -G nopasswdlogin